Retrieve Data From Multiple Tables Using Asp.Net MVC
Today, in this article, we will see the step-by-step process of joining multiple tables using LINQ Join and displaying records in a View. So, let's start.
Step 1
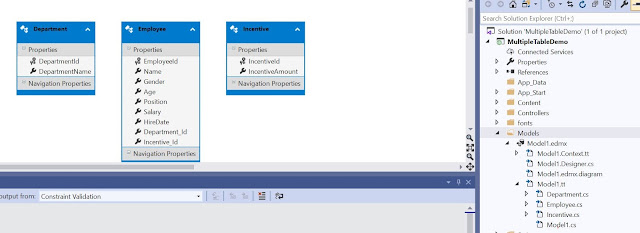
Open SQL server and create a database and 3 tables. I have created three tables as - Employee, Department, and Incentive respectively.
Employee Table
CREATE TABLE [dbo].[Employee](
[EmployeeId] [int] IDENTITY(1,1) NOT NULL,
[Name] [nvarchar](50) NULL,
[Gender] [char](10) NULL,
[Age] [int] NULL,
[Position] [nvarchar](50) NULL,
[Salary] [int] NULL,
[HireDate] [datetime] NULL,
[Department_Id] [int] NULL,
[Incentive_Id] [int] NULL,
CONSTRAINT [PK_Employee] PRIMARY KEY CLUSTERED
(
[EmployeeId] ASC
)WITH (PAD_INDEX = OFF, STATISTICS_NORECOMPUTE = OFF, IGNORE_DUP_KEY = OFF, ALLOW_ROW_LOCKS = ON, ALLOW_PAGE_LOCKS = ON) ON [PRIMARY]
) ON [PRIMARY]
GO
Department Table
CREATE TABLE [dbo].[Department](
[DepartmentId] [int] IDENTITY(1,1) NOT NULL,
[DepartmentName] [nvarchar](50) NULL,
PRIMARY KEY CLUSTERED
(
[DepartmentId] ASC
)WITH (PAD_INDEX = OFF, STATISTICS_NORECOMPUTE = OFF, IGNORE_DUP_KEY = OFF, ALLOW_ROW_LOCKS = ON, ALLOW_PAGE_LOCKS = ON) ON [PRIMARY]
) ON [PRIMARY]
GO
Incentive Table
CREATE TABLE [dbo].[Incentive](
[IncentiveId] [int] IDENTITY(1,1) NOT NULL,
[IncentiveAmount] [int] NULL,
PRIMARY KEY CLUSTERED
(
[IncentiveId] ASC
)WITH (PAD_INDEX = OFF, STATISTICS_NORECOMPUTE = OFF, IGNORE_DUP_KEY = OFF, ALLOW_ROW_LOCKS = ON, ALLOW_PAGE_LOCKS = ON) ON [PRIMARY]
) ON [PRIMARY]
GO
Step 2
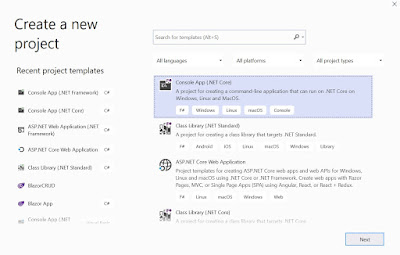
Open Visual Studio click on "New Project", and create an Mvc web application project.
Now add Model Entity click on Models folder And Add New Entity
You will get a window; from there, select Data from the left panel and choose ADO.NET Entity Data Model, give it the name DBModels (this name is not mandatory, you can give any name) and click "Add".
After clicking on NEXT, another window will appear. Choose the database table name as shown in the below screenshot and click "Finish".
Entity Framework gets added and the respective class gets generated under the Models folder.
Step 4
Right-click the Controllers folder, select Add Empty Controller give name to controller
Complete code for Demo Controller
using MultipleTableDemo.Models;
using System;
using System.Collections.Generic;
using System.Linq;
using System.Web;
using System.Web.Mvc;
namespace MultipleTableDemo.Controllers
{
public class DemoController : Controller
{
// GET: Demo
public ActionResult Index()
{
using (ShanelEntities Db = new ShanelEntities())
{
List<Employee> emp = Db.Employees.ToList();
List<Department> Dept = Db.Departments.ToList();
List<Incentive> Inc = Db.Incentives.ToList();
var Result = from e in emp
join d in Dept on e.Department_Id equals d.DepartmentId into table1
from d in table1.ToList()
join i in Inc on e.Incentive_Id equals i.IncentiveId into table2
from i in table2.ToList()
select new ViewModel
{
employee = e,
department = d,
incentive = i
};
return View(Result);
}
}
}
}
Step 5
Create a ViewModel Class.
using System;
using System.Collections.Generic;
using System.Linq;
using System.Web;
namespace WorkingWithMultipleDataTable_Demo.Models
{
public class ViewModel
{
public Employee employee { get; set; }
public Department department { get; set; }
public Incentive incentive { get; set; }
}
}
Step 6
Right-click on the index action method in Controller. The "Add View" window will appear with default index name unchecked (use a Layout page), and click on "Add", as shown in the below screenshot. The View will be added in the Views folder under Demo folder with the name index.
Step 7
Design the View HTML, .cshtml, and bootstrap 4 classes.
Complete Index View code
@model IEnumerable<MultipleTableDemo.Models.ViewModel>
@{
Layout = null;
}
<!DOCTYPE html>
<html>
<head>
<meta name="viewport" content="width=device-width" />
<title>Index</title>
<link href="~/Content/bootstrap.min.css" rel="stylesheet" />
<script type="text/javascript" src="@Url.Action("~/scripts/jquery-3.3.1.min.js")"></script>
<script type="text/javascript" src="@Url.Action("~/scripts/bootstrap.min.js")"></script>
</head>
<body>
<div class="container-fluid py-4">
<h4 class="text-center text-uppercase">Employee List</h4>
<table class="table table-striped table-bordered">
<thead class="bg-dark text-white">
<tr>
<th>Name</th>
<th>Position</th>
<th>Salary</th>
<th>Hire Date</th>
<th>Department</th>
<th>Incentive</th>
</tr>
</thead>
<tbody>
@foreach (var item in Model)
{
<tr>
<td>@item.employee.Name</td>
<td>@item.employee.Position</td>
<td>@item.employee.Salary</td>
<td>@item.employee.HireDate</td>
<td>@item.department.DepartmentName</td>
<td>@item.incentive.IncentiveAmount</td>
</tr>
}
</tbody>
</table>
</div>
</body>
</html>


Comments
Post a Comment